
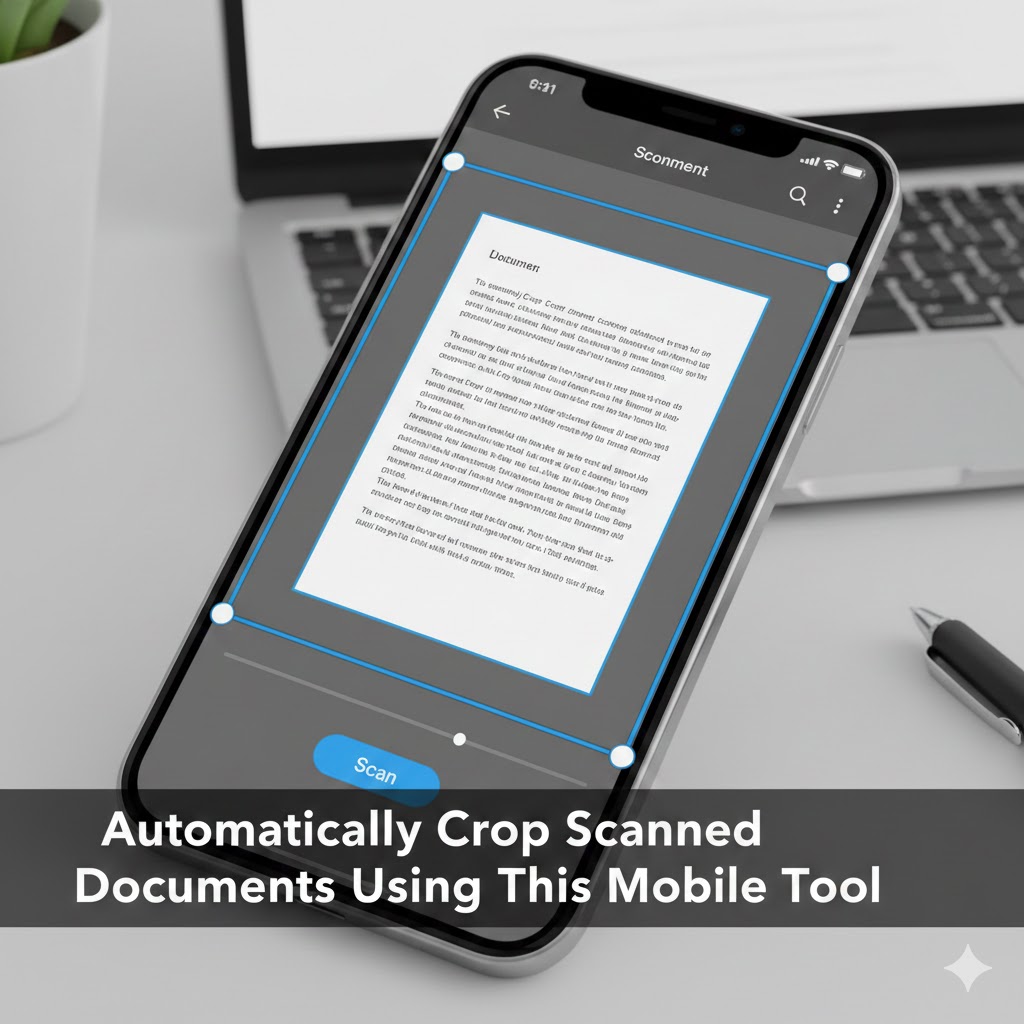
Are you tired of manually adjusting cropping boundaries every time you scan a document with your phone? Do your scanned documents end up with awkward borders, shadows, or background clutter that make them look unprofessional? The frustration of creating clean, properly cropped digital documents from paper originals has plagued mobile users for years, but modern smartphone technology now includes powerful tools that can automatically crop scanned documents with remarkable precision.
This comprehensive guide reveals the built-in mobile features and specialized applications that transform your smartphone into a professional document scanner capable of detecting edges, removing backgrounds, and automatically cropping scanned documents to perfection. Understanding these tools and techniques can revolutionize how you digitize receipts, contracts, business cards, notes, and any other paper documents you encounter.
The days of struggling with imperfect scans are over. Today’s mobile scanning technology uses advanced image processing, artificial intelligence, and computer vision to identify document boundaries instantly and automatically crop scanned documents with professional results. Whether you’re a student digitizing lecture notes, a business professional managing receipts, or simply someone trying to reduce paper clutter, these mobile tools will transform your document workflow.
1. Understanding Automatic Document Cropping Technology
Before exploring specific tools that automatically crop scanned documents, it’s essential to understand the technology that makes this seemingly magical process possible.
Edge Detection and Computer Vision
The foundation of automatic document cropping is edge detection—a computer vision technique that identifies boundaries where pixel colors change dramatically. When you photograph a document on a contrasting surface, the document’s edges create sharp transitions between the paper and the background.
Modern smartphones employ sophisticated edge detection algorithms that analyze your camera feed in real-time. These algorithms identify straight lines and rectangular shapes, recognizing patterns consistent with document edges. The processing happens so quickly that you see the detected boundaries highlighted on your screen as you position the camera.
Advanced algorithms distinguish between actual document edges and other rectangular objects in the frame. They evaluate factors like aspect ratios, corner angles, and surface texture to determine which detected rectangle is most likely the document you’re trying to scan.
Perspective Correction and Keystoning
Simply cropping to detected edges isn’t sufficient for professional results. Documents photographed at angles suffer from perspective distortion—a phenomenon where parallel lines appear to converge, making rectangular documents look trapezoidal.
Automatic cropping systems include perspective correction that transforms distorted images back into proper rectangles. This process, also called keystone correction, uses mathematical transformations to compensate for the camera’s viewing angle and produce results that look as if the document were photographed perfectly straight-on.
The transformation preserves text readability and maintains proper aspect ratios, ensuring that scanned documents appear identical to the originals despite being photographed from imperfect angles.
Machine Learning and Document Recognition
Modern scanning tools employ machine learning models trained on millions of document images. These models learn to recognize documents across various conditions—different lighting, backgrounds, paper colors, and document types.
The neural networks powering these systems can distinguish documents from non-documents, identify different document types like receipts versus full-page letters, and even recognize multiple documents in a single frame. This intelligence allows scanning apps to automatically crop scanned documents accurately even in challenging scenarios.
Machine learning also enables continuous improvement. As users scan more documents and provide feedback through corrections, the underlying models become more accurate and capable of handling edge cases that might have confused earlier versions.
2. Google Drive’s Built-in Document Scanner
One of the most accessible tools to automatically crop scanned documents is already installed on most Android devices and available free for iOS users—the document scanning feature built into Google Drive.
Accessing the Scanner in Google Drive
Google Drive includes a powerful document scanner hidden within its mobile app. To access it, open the Google Drive app on your smartphone and tap the plus icon in the bottom right corner. From the menu that appears, select “Scan” to activate the document scanning camera.
The scanner interface immediately displays your camera view with an overlay showing detected document boundaries. Google Drive’s computer vision algorithms work in real-time, highlighting the document edges as you position your phone above the paper.
The highlighted boundary updates continuously as you adjust your phone’s position, showing you exactly what area will be captured in the final scan. This real-time feedback makes it easy to ensure the entire document is within the frame before capturing.
Automatic Boundary Detection Features
Google Drive’s scanner excels at detecting document edges even in less-than-ideal conditions. It works with documents on busy backgrounds, can identify documents at various angles, and successfully crops scanned documents when multiple papers are visible in the frame.
When you tap the shutter button, Google Drive captures the image and applies automatic cropping based on the detected boundaries. The app then displays a preview showing the cropped result along with corner adjustment handles that allow manual refinement if needed.
If the automatic detection missed the correct boundaries, you can manually adjust the four corner points by dragging them to the proper positions. This hybrid approach combines automatic efficiency with manual precision when needed.
Enhancement and Processing Options
After cropping, Google Drive offers several enhancement options that improve scan quality. The app can automatically crop scanned documents and apply color correction, contrast adjustment, and shadow removal to produce clean, readable results.
The processing modes include color, black and white, and drawing modes optimized for different document types. Color mode preserves the original appearance, black and white creates high-contrast text documents perfect for printing, and drawing mode optimizes for hand-drawn sketches and diagrams.
Google Drive’s enhancements happen automatically after cropping, but you can toggle between different processing modes to choose the result that best suits your needs. The processed documents save directly to your Google Drive storage, making them immediately accessible across all your devices.
Multi-Page Document Scanning
Google Drive supports scanning multiple pages into a single PDF document. After capturing and cropping the first page, tap the plus icon to add additional pages. Each page goes through the same automatic detection and cropping process.
This feature is invaluable for scanning multi-page contracts, reports, or any document longer than a single sheet. The resulting PDF maintains proper page order and can be easily shared, printed, or uploaded to other services.
3. Apple Notes Native Scanning Capability
iPhone and iPad users have access to powerful document scanning built directly into the Notes app, providing seamless integration with Apple’s ecosystem and excellent automatic cropping capabilities.
Activating Document Scanning in Notes
Open the Notes app and create a new note or open an existing one. Tap the camera icon above the keyboard and select “Scan Documents” from the menu. This launches the integrated document scanner with real-time edge detection.
The Notes scanner displays a live camera view with yellow highlighting around detected document boundaries. As you position your iPhone above a document, the highlighting adjusts to show the detected edges, providing clear visual feedback about what will be captured.
Apple’s scanner can operate in automatic or manual modes. In automatic mode, the camera captures the image as soon as it detects stable document boundaries and proper focus. Manual mode requires you to press the shutter button, giving you more control over timing.
Automatic Mode Benefits and Limitations
Automatic mode is remarkably convenient for scanning multiple documents quickly. Simply position your phone above a document and wait briefly—the scanner detects the edges, ensures focus, and captures the image without requiring any button presses.
This hands-free operation is perfect for scanning stacks of receipts or pages from a book. The automatic timing ensures captures happen when the document is properly detected and the image is sharp, reducing blurry scans from camera movement.
However, automatic mode can be overeager in busy environments with multiple rectangular objects. If the scanner keeps triggering prematurely, switch to manual mode for more precise control over capture timing.
Post-Capture Adjustment and Refinement
After capturing a document, Apple Notes displays a preview with the automatically detected crop boundaries. The four corner points are adjustable if the automatic detection wasn’t perfect, allowing you to refine the cropping manually.
Drag the corner handles to adjust the crop boundaries, then tap “Keep Scan” to apply the changes. The app applies perspective correction and image enhancement automatically, producing clean, properly oriented results.
Notes also offers filters that adjust the appearance of scanned documents. The default Auto filter intelligently enhances contrast and removes shadows. Photo preserves the original colors, Black & White creates high-contrast text documents, and Grayscale provides a middle ground.
Scanning Multiple Pages and Organization
The Notes scanner makes it easy to automatically crop scanned documents consisting of multiple pages. After capturing the first page, the scanner remains active, ready to capture additional pages. Each page goes through automatic detection and cropping independently.
Completed multi-page scans appear as embedded documents within your note. Tap any scan to view all pages, reorder them, add additional pages, or share the entire document as a single PDF. This integration makes Notes an excellent tool for quick document digitization without needing separate scanning apps.
4. Microsoft Office Lens Specialized Features
Microsoft Office Lens is a dedicated scanning application that provides advanced capabilities to automatically crop scanned documents with professional results optimized for business use.
Installing and Configuring Office Lens
Download Microsoft Office Lens free from the App Store or Google Play Store. After installation, open the app and sign in with your Microsoft account to enable cloud saving features, though guest access is available for basic scanning.
Office Lens presents an intuitive interface with capture modes optimized for different document types. The Document mode is designed specifically for paper documents and provides the most aggressive automatic cropping and enhancement.
Additional modes include Whiteboard for capturing whiteboard content with glare removal, Business Card for scanning contact information, and Photo for general images without document-specific processing. Each mode applies different detection algorithms optimized for its specific purpose.
Advanced Edge Detection Algorithms
Office Lens employs Microsoft’s computer vision technology to detect document boundaries with exceptional accuracy. The app recognizes documents on complex backgrounds, handles poor lighting conditions, and successfully identifies documents even when they’re partially obscured.
The real-time preview shows detected boundaries with color-coded indicators. Green highlighting means the app has confidently identified all four corners. Yellow indicates uncertainty, suggesting you should adjust your position or improve lighting before capturing.
When you capture an image, Office Lens applies automatic cropping based on the detected boundaries, then performs sophisticated image processing including perspective correction, rotation adjustment, and edge sharpening.
OCR and Text Recognition Integration
Beyond simple scanning, Office Lens includes optical character recognition that extracts text from scanned documents. After cropping and enhancement, you can select text recognition to convert the document into editable text.
This OCR capability is particularly valuable for receipts, business cards, and typed documents. The extracted text can be copied, searched, or exported to Word and OneNote with formatting preserved. For business cards, Office Lens can automatically populate contact information into your phone’s address book.
The combination of automatic cropping and text recognition transforms Office Lens from a simple scanner into a complete document digitization solution that makes scanned content actionable and searchable.
Cloud Integration and Export Options
Office Lens seamlessly integrates with Microsoft’s ecosystem, allowing you to save scanned and cropped documents directly to OneDrive, OneNote, or send them as email attachments. The app can also export to local storage or other cloud services.
When saving to OneDrive, scanned documents automatically sync across all your devices. OneNote integration is particularly powerful—scanned documents become searchable notebook pages with OCR text indexed for quick retrieval.
5. Adobe Scan Professional-Grade Capabilities
Adobe Scan brings Adobe’s image processing expertise to mobile document scanning, offering some of the most sophisticated automatic cropping available on smartphones.
Getting Started with Adobe Scan
Download Adobe Scan from your device’s app store. The app is free to use with basic features, though some advanced capabilities require an Adobe account. After installation, Adobe Scan requests camera permissions and provides a quick tutorial on scanning techniques.
The main interface displays your camera view with real-time document detection. Adobe Scan uses advanced algorithms that can detect multiple documents in a single frame, automatically separating them into individual scans—a unique capability among mobile scanning tools.
The capture process offers both automatic and manual modes. Automatic mode continuously monitors the camera view and captures images when it detects stable, well-focused documents. Manual mode requires you to tap the shutter button for each page.
Multi-Document Detection Technology
Adobe Scan’s ability to detect and separately automatically crop scanned documents when multiple pages appear in frame is revolutionary for batch scanning. Lay out multiple receipts, business cards, or document pages on a surface, and Adobe Scan identifies each one independently.
When you capture the image, Adobe Scan processes each detected document separately, applying appropriate cropping, perspective correction, and enhancement to each. The results appear as individual scanned documents rather than a single image containing multiple items.
This technology dramatically accelerates scanning workflows when you have many small documents to digitize. Instead of positioning and scanning each receipt individually, photograph them all at once and let Adobe Scan handle the separation.
AI-Powered Enhancement Features
Adobe Scan applies artificial intelligence to enhance scanned documents beyond simple cropping. The app automatically removes shadows, corrects color balance, sharpens text, and optimizes contrast to produce remarkably clean results.
The AI recognizes different document types and applies appropriate processing. Forms and printed documents receive high-contrast black and white treatment, while photos and colorful documents maintain color fidelity. You can override these automatic choices if the default processing doesn’t match your preferences.
Adobe Scan’s enhancement technology is particularly effective with challenging source material. Documents photographed in poor lighting, with heavy shadows, or on non-ideal backgrounds still produce professional-looking scans after Adobe’s processing.
PDF Creation and Management
Scanned documents save as PDFs in Adobe Scan’s library. The app provides robust PDF management including page reordering, rotation, deletion, and merging multiple scans into single documents. You can also add pages to existing PDFs, making it easy to build comprehensive documents over time.
Adobe Scan includes optical character recognition that makes PDFs searchable and enables text selection. The OCR processing happens automatically in the background after scanning, making your scanned documents fully functional digital files rather than static images.
6. CamScanner Popular Features and Workflow
CamScanner has been a popular mobile scanning solution for years, offering comprehensive features to automatically crop scanned documents along with collaborative capabilities useful for teams.
Core Scanning Functionality
CamScanner’s interface emphasizes speed and simplicity. Open the app and tap the camera button to begin scanning. The real-time view displays detected document boundaries with colored overlay, updating continuously as you position your device.
Capture methods include automatic shooting when the document is detected and stable, manual capture with the shutter button, or batch mode for photographing multiple pages in rapid succession. Batch mode is particularly efficient for scanning books or lengthy documents.
After capture, CamScanner presents the cropped preview with adjustable corner points. The automatic detection is generally accurate, but manual adjustment ensures perfect results when needed. Apply cropping and the app proceeds to enhancement options.
Enhancement Filters and Processing
CamScanner offers multiple enhancement filters optimized for different source materials. The Original filter maintains the captured image with minimal processing. Auto enhances contrast and removes shadows while preserving colors.
Enhance mode provides aggressive contrast and sharpening ideal for typed documents. Magic Color balances colors for vibrant results. Black and white creates high-contrast monochrome documents perfect for text.
Each filter applies different processing algorithms to the automatically cropped image. You can switch between filters to compare results and choose the most appropriate for your specific document. The selected filter applies across all pages in a multi-page scan for consistency.
Collaboration and Sharing Features
CamScanner includes collaboration features that distinguish it from simpler scanning apps. Scanned documents can be organized into folders, tagged for categorization, and shared with other CamScanner users who can view, comment, or collaborate on the documents.
These features are valuable for team projects, document review workflows, or sharing scanned materials with colleagues. Recipients don’t need to manually crop or process shared documents—they receive the final, enhanced versions after automatic cropping and optimization.
The app also supports traditional sharing methods including email, messaging apps, cloud storage services, and direct printing. PDFs generated from scanned documents can be password-protected for security.
Premium Features and Limitations
While CamScanner offers free scanning with automatic cropping, some advanced features require premium subscriptions. Free users may encounter watermarks on scanned documents, limitations on the number of scans per day, or restricted access to certain enhancement filters.
The premium version removes these limitations and adds features like OCR text recognition, document translation, and additional cloud storage. Evaluate whether the free version meets your needs or if premium features justify the subscription cost for your use case.
7. Genius Scan Simplicity and Speed
Genius Scan focuses on delivering fast, straightforward document scanning with excellent automatic cropping and minimal complexity—ideal for users who want reliable results without extensive configuration.
Streamlined Scanning Interface
Genius Scan’s interface is refreshingly simple. Open the app and you immediately see your camera view with document detection active. Detected boundaries appear highlighted, and a single tap captures the image.
The app prioritizes speed throughout the scanning workflow. Automatic boundary detection is fast and accurate, cropping happens instantly after capture, and you can immediately proceed to the next page or save the completed scan.
This efficiency makes Genius Scan perfect for quick document capture in time-sensitive situations. Scanning a receipt while standing in line or capturing a document during a meeting happens in seconds without complicated menus or settings.
Intelligent Cropping Algorithms
Despite its simplicity, Genius Scan employs sophisticated algorithms to automatically crop scanned documents accurately. The app handles various document sizes, from business cards to poster-sized pages, and works reliably with different paper colors and backgrounds.
The boundary detection adapts to lighting conditions, compensating for shadows and glare that might confuse simpler algorithms. If automatic detection isn’t perfect, manual corner adjustment is quick and intuitive.
Genius Scan also includes automatic page size detection that recognizes standard formats like Letter, A4, or business card dimensions. This recognition ensures proper aspect ratios and can trigger appropriate enhancement profiles for different document types.
Export Options and Integration
Scanned documents can be exported as PDFs or JPEG images. Multi-page scans combine into single PDF files with proper page ordering. The app supports direct uploads to cloud storage services including Dropbox, Google Drive, Box, and Evernote.
Email integration allows sending scanned documents directly from the app without saving to your device first. This immediate sharing capability is valuable when you need to forward documents to colleagues or clients immediately after scanning.
Genius Scan also includes basic PDF editing features like page rotation, deletion, and reordering. While not as comprehensive as dedicated PDF editors, these tools handle common adjustments needed after scanning.
8. Tips for Optimal Automatic Cropping Results
While modern tools do excellent work to automatically crop scanned documents, following best practices ensures the highest quality results with minimal manual adjustment needed.
Proper Lighting Techniques
Lighting dramatically affects document detection accuracy. Even illumination without harsh shadows produces the best automatic cropping results. Position yourself so your body doesn’t cast shadows across the document you’re photographing.
Natural diffused light from windows provides excellent conditions for scanning. If using artificial light, overhead lights work better than directional desk lamps that create strong shadows. Avoid backlit situations where the document appears dark against bright backgrounds.
For challenging lighting conditions, some scanning apps include built-in lights or flash options. However, direct flash often creates glare on glossy documents. If using flash, angle your phone slightly to avoid perpendicular reflection.
Background Selection and Contrast
Choose backgrounds that contrast strongly with your document. White paper scans best against dark surfaces, while documents with dark printing or colored paper benefit from light backgrounds. High contrast helps edge detection algorithms identify boundaries accurately.
Avoid busy or patterned backgrounds that might confuse edge detection. Simple, solid-colored surfaces work best. Common good choices include dark wooden tables for white documents or white desktops for darker materials.
Clear the scanning area of other papers or objects. While advanced algorithms can detect multiple documents or distinguish the target document from background clutter, removing distractions improves detection accuracy and reduces the chance of incorrect boundary identification.
Camera Positioning and Angles
Hold your phone parallel to the document surface for the most accurate perspective correction. While scanning apps can correct significant angles, starting with proper positioning reduces the amount of mathematical transformation needed and preserves more image detail.
Maintain sufficient distance from the document to ensure your entire page fits within the frame with some margin space around the edges. Getting too close might cause corners to fall outside the camera view, preventing successful boundary detection.
Center the document in your camera frame. While not strictly necessary for modern apps, centered positioning provides more balanced perspective correction and reduces distortion at the edges of the resulting scan.
Handling Difficult Documents
Some document types challenge automatic cropping systems. Very thin or translucent paper might not create strong enough edge contrast. Crumpled or bent documents with non-rectangular shapes confuse boundary detection algorithms.
For problematic documents, try different backgrounds or lighting. Sometimes smoothing crumpled papers under a sheet of glass helps create detectable edges. If automatic detection consistently fails, switch to manual cropping mode where you specify corner positions manually.
Documents with dark borders or frames might be detected at the border edge rather than the paper edge. Review the detected boundaries carefully before capture, and manually adjust if the system identified the wrong edges.
9. Organizing and Managing Scanned Documents
Successfully cropping documents is just the first step. Effective organization ensures you can find and use your scanned documents when needed.
Folder Structures and Naming Conventions
Most scanning apps include basic organization features. Create folders for different document categories—receipts by month, contracts by client, or personal documents by type. Consistent folder structures make retrieval intuitive.
Establish naming conventions that include dates and descriptive identifiers. For example, “2025-01-15_Vendor_Invoice” immediately communicates what the document is and when it was created. Consistent naming enables sorting and searching across your document library.
Some apps offer tagging systems that complement folder organization. Tags allow documents to belong to multiple categories simultaneously—a business dinner receipt might be tagged with the client name, project, and expense type, making it findable through multiple search paths.
Cloud Storage Integration
Connecting your scanning app to cloud storage services ensures scanned documents are backed up automatically and accessible across devices. Most scanning apps integrate with popular services like Google Drive, Dropbox, OneDrive, and iCloud.
Configure automatic upload settings so scanned documents immediately sync to the cloud after cropping and enhancement. This automation eliminates the risk of losing scans stored only on your phone if the device is lost or damaged.
Consider using dedicated cloud folders for scanned documents separate from other files. This organization makes it easier to apply appropriate retention policies, sharing settings, or backup schedules specifically for scanned materials.
OCR for Searchability
Optical character recognition transforms image-based scans into searchable documents. Many premium scanning apps include OCR that runs automatically after cropping, extracting text content and embedding it in PDF files.
Searchable PDFs look identical to image-only versions but contain hidden text layers that enable keyword searches. This capability is invaluable when you need to locate specific documents within large archives—search for contract terms, receipt amounts, or names without manually reviewing every scan.
Some cloud storage services and document management systems also provide OCR processing. Upload your scanned documents and the service automatically extracts searchable text, creating comprehensive indexes of your document library.
Retention Policies and Cleanup
Digital hoarding is easy when storage costs are low, but maintaining large collections of scanned documents can become unwieldy. Establish retention policies that specify how long different document types should be kept.
Tax-related receipts might be retained for seven years, while grocery receipts might be deleted monthly. Old insurance documents can be discarded after policies expire. Regular review and cleanup prevent your scanned document library from becoming overwhelming.
Most scanning apps include bulk selection and deletion features. Schedule quarterly or annual reviews where you sort through scanned documents and remove items that no longer need retention.
10. Advanced Use Cases and Workflows
Beyond basic document scanning, automatic cropping technology enables sophisticated workflows that transform how you handle paper-based information.
Receipt and Expense Management
Business professionals and individuals managing expenses benefit enormously from mobile scanning. Photograph receipts immediately after purchases while still at the location, eliminating the risk of lost paper receipts.
Many expense management applications integrate with scanning apps or include built-in scanners. Automatically cropped receipt scans can be directly imported into expense reports with amounts, dates, and vendors extracted through OCR and AI recognition.
Configure automatic categorization based on vendor names or receipt patterns. Restaurant receipts route to meal expense categories, fuel receipts to transportation, and office supply receipts to operational expenses, reducing manual data entry.
Archiving Important Documents
Scanning important documents creates digital backups that protect against physical loss from fire, flood, or simple misplacement. Birth certificates, passports, property deeds, insurance policies, and legal contracts should all be scanned and securely stored.
Create a systematic archiving workflow. Dedicate time monthly or quarterly to scan important papers that have accumulated. Organize scanned documents logically and store encrypted copies in multiple locations including offline backup drives.
For particularly critical documents, consider scanning at higher resolutions than standard mobile scans provide. While automatic cropping works at any resolution, some scanning apps allow quality adjustments. Higher quality preserves fine print and subtle details.
Student Note Digitization
Students can revolutionize their study workflows by scanning handwritten notes and class materials. Automatically crop scanned documents from notebooks, keeping digital copies organized by class and date.
Digital notes become searchable with OCR, making exam preparation more efficient. Instead of flipping through physical notebooks, search for specific topics or concepts across all your digitized notes simultaneously.
Sharing notes with classmates becomes trivial when everything is digital. Group study sessions can draw from each participant’s scanned materials, creating comprehensive study resources that exceed what any individual captured.
Professional Document Workflows
Lawyers, accountants, contractors, and other professionals handle substantial paper document volumes. Mobile scanning with automatic cropping enables on-site document capture—photograph documents at client locations and immediately have properly cropped digital versions for your office systems.
Integration with document management systems streamlines professional workflows. Scanned documents route automatically to appropriate case files, client folders, or project archives based on metadata or OCR-extracted information.
Mobile scanning also facilitates remote work. Professionals can capture and process documents from anywhere rather than needing to return to offices with dedicated scanners. This flexibility supports modern distributed work arrangements.
11. Troubleshooting Common Cropping Issues
Even sophisticated automatic cropping systems occasionally encounter problems. Understanding common issues and their solutions ensures consistently good results.
Edge Detection Failures
When scanning apps fail to detect document edges, check lighting conditions first. Insufficient light or harsh shadows often prevent clear edge identification. Improve illumination or reposition to eliminate shadows.
Background contrast problems also cause detection failures. If your white document is on a white surface, edges blend together invisibly. Move to a contrasting background or place a dark sheet behind the document.
Documents with non-rectangular shapes or severely bent corners confuse automatic detection. Flatten documents as much as possible before scanning. For bound books or notebooks, flatten the page being scanned even if surrounding pages remain curved.
Incorrect Boundary Selection
Sometimes apps detect edges successfully but identify the wrong boundaries. This happens when multiple rectangular objects appear in the frame—the app might detect a window, picture frame, or other document instead of your target.
Remove competing rectangular objects from the frame when possible. If this isn’t practical, use manual capture mode instead of automatic and verify the highlighted boundaries before capturing. Adjust manual corner handles if needed.
For documents with dark borders or frames, apps might detect the inner edge of the border rather than the paper edge. Review detected boundaries carefully and manually adjust to include the entire document including borders if that’s your intent.
Perspective Distortion Problems
Excessive viewing angles create perspective distortion that even sophisticated correction algorithms struggle to fully compensate. The mathematical transformations required for severe distortion can create artifacts or reduce detail in the corrected image.
Hold your device as parallel to the document as practically possible. If you must scan at an angle—such as photographing wall-mounted documents—move farther away and zoom slightly rather than getting close at an extreme angle.
After capture, review the cropped result for distortion artifacts. If perspective correction created noticeable problems, recapture the image from a better angle rather than attempting to work with flawed scans.
Quality and Resolution Issues
Blurry or low-resolution scans often result from camera shake or insufficient lighting forcing the camera to use slow shutter speeds. Hold your device steady when capturing—brace your arms against your body or rest the phone on a stable surface if needed.
Ensure adequate lighting so the camera can use faster shutter speeds that freeze motion. Most scanning apps provide feedback about image focus and stability, delaying automatic capture until conditions improve.
Some apps allow resolution adjustments in settings. Higher resolution settings capture more detail but create larger files. Balance quality needs against storage constraints based on your specific use case.
12. Privacy and Security Considerations
Scanning important documents raises privacy and security questions. Understanding these issues helps you handle sensitive scanned materials appropriately.
Data Security in Scanning Apps
When you automatically crop scanned documents using mobile apps, consider where that data goes. Some apps process images entirely on your device, while others upload to cloud servers for processing or storage.
Review app privacy policies to understand data handling practices. Apps requiring cloud processing might temporarily store your documents on their servers. While reputable companies implement encryption and delete temporary files, sensitive documents warrant extra scrutiny.
Choose apps from trusted developers with established privacy practices. Major companies like Google, Microsoft, and Apple have substantial reputations to protect and implement strong security measures. Unknown developers might not provide the same assurances.
Encrypted Storage Options
For highly sensitive documents—financial records, legal papers, medical information—use apps that offer encrypted storage or integrate with encrypted cloud services. Encryption ensures that even if files are compromised, the content remains unreadable without proper credentials.
Some scanning apps include password protection for individual documents or entire document libraries. Enable these features for sensitive materials even if you trust your device security—defense in depth protects against multiple potential breach vectors.
Consider using dedicated secure document storage services specifically designed for sensitive materials. These services often provide additional features like access logging, expiration dates for shared documents, and granular permission controls.
Secure Sharing Practices
When sharing scanned documents, consider the sensitivity of the information they contain. Email attachments travel across multiple servers and remain in recipients’ inboxes indefinitely. For sensitive documents, use secure sharing methods with expiration dates and access controls.
Many cloud storage services offer secure sharing links that can be password-protected and set to expire after a specified time. These links provide temporary access without giving recipients permanent copies.
Before sharing any document, review it carefully to ensure it doesn’t contain sensitive information you didn’t intend to include. Scanned multi-page documents might include pages you forgot to remove, or edges of the scan might capture information from adjacent papers.
Conclusion: Transforming Paper into Digital Efficiency
The ability to automatically crop scanned documents using mobile technology has fundamentally changed how we interact with paper-based information. What once required expensive dedicated scanners, careful positioning, and tedious manual editing now happens instantly through the camera you already carry in your pocket.
Modern scanning tools leverage advanced computer vision, machine learning, and image processing to deliver professional results with minimal effort. Whether you use the built-in scanners in Google Drive or Apple Notes, specialized applications like Adobe Scan and Microsoft Office Lens, or popular third-party tools like CamScanner and Genius Scan, you have access to powerful automatic cropping technology that produces clean, properly oriented digital documents.
The benefits extend far beyond mere convenience. Digital document management improves organization, enables powerful search capabilities, facilitates sharing and collaboration, and protects against physical loss. The small investment of time required to scan and organize documents pays dividends through improved efficiency and reduced stress when you need to locate important information.
Success with automatic document scanning requires understanding the technology, choosing appropriate tools for your needs, and following best practices for lighting, positioning, and background selection. These techniques ensure consistently excellent automatic cropping results that require minimal manual adjustment.
Take action today by exploring the scanning capabilities already available on your smartphone. Open Google Drive or Apple Notes and experiment with the built-in scanners. If you need more advanced features, explore dedicated scanning applications and find the one that best matches your workflow requirements.
Also read this:
Browser Feature Detects Fake Download Buttons Automatically
Recover Deleted Photos Without Apps Using This Phone Setting: The Complete Recovery Guide
This Browser Setting Instantly Speeds Up Slow Websites: The Ultimate Guide